Techgitz : Custom Rom Techgitz : Custom Rom

Pages

Ads


THIS AD SPACE FOR SALE!!!!! CLICK TO REEQUEST SPACE


Showing posts with label Custom Rom. Show all posts

Friday, 24 November 2017

How to Port Nougat Roms 3.18.35 [ TUTORIAL ]


THINGS YOU NEED;

1.NOTEPAD++

2.WINRAR,7ZIP OR ANY FILE EXTRACTOR

3.BOOT.IMG EXTRACTOR (I USE MTKBOOTIMG TOOL) LIKE CARLIV

4.LITTLE OF BRAIN(DONT BE LAZY IF DONT KNOW SOMETHING GOOGLE IT)

5.STOCK ROM(OR ANY STABLE ROM)

6 PORT ROM (ROM WHAT YOU WANT TO PORT)

LETS START:

1.copy kernel from stock (or any stable rom ) boot to port boot.img.repack it.

2.from stock system/bin copy vold and paste/replace in port system/bin;

3.from stock system/vendor copy firmware and paste in port system/vendor first delete port firmware.

4.from stock system/vendor/lib/hw copy hw.mt6580 composer.so and paste/replace to port system/vendor/lib/hw;

5.from stock/vendor/lib folder copy; lib.camalgo,lib.cameradrv,lib.cameracustom and paste/replace to port/system/vendor/lib;

6.from stock system/usr copy and replace generic.kl and thats it.

Note: in some ocassion when some keys dont work replace five(5) files with generic.kl included.

7.make a zip with winrar or 7zip and flash trough custom recovery.

NOTE; WITH THIS SIMPLE GUIDE ROM WILL BOOT. IF YOU FIND ANY BUGS FOR FIX USE STOCK VENDOR BLOBS.

NOTE2;PLEASE DONT ASK ME STUPID QUESTION ABOUT THIS.IT IS SO SIMPLE THAT ANYBODY CAN UNDERSTAND THIS GUIDE.

NOTE 3.; PLEASE WATCH MOUNTPOINT OF META-INF UPDATER SCRIPT .IF YOU DONT KNOW WHAT IS YOUR DEVICE MOUNTPOINT USE DISK INFO.APK FOR KNOWING THAT.OTHERWISE USE ANY OTHER UPDATER SCRIPT TO COMPARE MOUNTPOINT.

NOTE4.; FOR EXAMPLE MOUNTPOINT OF MOST MT6580 NOUGAT DEVICES IS HAVE THIS LINE AND THIS LINE IS COMMON ON MANY CASES:mount("ext4", "EMMC", "/dev/block/platform/mtk-msdc.0/11120000.msdc0/by-name/system", "/system"); AND THIS LINE ;package_extract_file("boot.img", "/dev/block/platform/mtk-msdc.0/11120000.msdc0/by-name/boot");. ON OTHER CASES HAVE OTHER LINES LIKE FORMAT,MOUNT,WITH SAME LINES,SO BE CAREFULL.

Credit: RUDI KOVAC

PORTING GUIDE FOR LOLLIPOP DEVICES. 3.10.XX


THINGS YOU NEED;

1.NOTEPAD++

2.WINRAR,7ZIP OR ANY FILE EXTRACTOR

3.BOOT.IMG EXTRACTOR (I USE MTKBOOTIMG TOOL) LIKE CARLIV

4.LITTLE OF BRAIN(DONT BE LAZY IF DONT KNOW SOMETHING GOOGLE IT)

5.STOCK ROM LP (OR ANY STABLE ROM)

6 PORT ROM LP (ROM WHAT YOU WANT TO PORT)


LETS START: 1.copy kernel from stock (or any stable rom ) boot to port boot.img.repack it.

2.copy ueventd from stock boot.img initrd folder to port boot.img initrd

3.from stock system/bin copy pq,vold and paste/replace in port system/bin;

4.from stock system/etc copy firmware,mddb,wifi,bluetooth folders and paste in port system/etc first delete port firmware,mddb,wifi,bluetooth.

5.from stock system/lib/hw copy complete folder and paste/replace to port system/lib.

6.from stock system/lib copy soundfx and module if exist(if dont skip)

7.from stock/lib folder copy; audio.primarydefault.so, lib.camalgo,lib.cameradrv,lib.cameracustom and paste/replace to port/system/lib;

8.from stock system/usr copy and replace generic.kl and thats it.

9.from stock system/vendor copy lib folder and replace in port system/vendor folder.

10.make a zip with winrar or 7zip and flash trough custom recovery.

NOTE; WITH THIS SIMPLE GUIDE ROM WILL BOOT. IF YOU FIND ANY BUGS FOR FIX USE STOCK VENDOR BLOBS.

NOTE2;PLEASE DONT ASK ME STUPID QUESTION ABOUT THIS.IT IS SO SIMPLE THAT ANYBODY CAN UNDERSTAND THIS GUIDE.

NOTE 3.; PLEASE WATCH MOUNTPOINT OF META-INF UPDATER SCRIPT .IF YOU DONT KNOW WHAT IS YOUR DEVICE MOUNTPOINT USE DISK INFO.APK FOR KNOWING THAT.OTHERWISE USE ANY OTHER UPDATER SCRIPT TO COMPARE MOUNTPOINT.

NOTE4.; FOR EXAMPLE MOUNTPOINT OF MOST MT6580 MM DEVICES(FOR LOLLIPOP I AM NOT SURE) IS SYSTEM 18,DATA 20,BOOT.IMG 7,LOGO 10,ALSO IN SOME ROMS CAN HAVE THIS LINE AND THIS LINE IS COMMON ON MANY CASES:mount("ext4", "EMMC", "/dev/block/platform/mtk-msdc.0/11120000.msdc0/by-name/system", "/system"); AND THIS LINE ;package_extract_file("boot.img", "/dev/block/platform/mtk-msdc.0/11120000.msdc0/by-name/boot");. ON OTHER CASES HAVE OTHER LINES LIKE FORMAT,MOUNT,WITH SAME LINES,SO BE CAREFULL.

NOTE5; REMEMBER ONE THING.IT IS EASIER TO SAY I “DONT KNOW SOMETHING” THEN MAKE YOURSELF SMARTER THEN YOU THINK YOU ARE.WE ARE HERE TO HELP YOU.


CREDIT : RUDI KOVAC

Thursday, 9 November 2017

How to fix Unknown Baseband on any Custom Rom

I want to show you how you can fix on any Custom Rom. This guide is very important for you because you need to follow this guide before you venture into flashing a Custom Rom on your Android device.

*Let's Begin

Before flashing any Custom Rom it is always advisable to have the backup of your Stock Rom in case any thing goes wrong.

There are always cases of having Unknown Baseband after flashing some Custom Roms on your Android device.

Example below


So to fix this we are going to need root explorer app.
♦ You can download ES File Explorer from Google Play Store.
♦ After that you will open the app.
♦ Click the 3 dot by the left side to open the menu.
♦ Scroll and Check Root Explorer. You must be rooted to use this function.


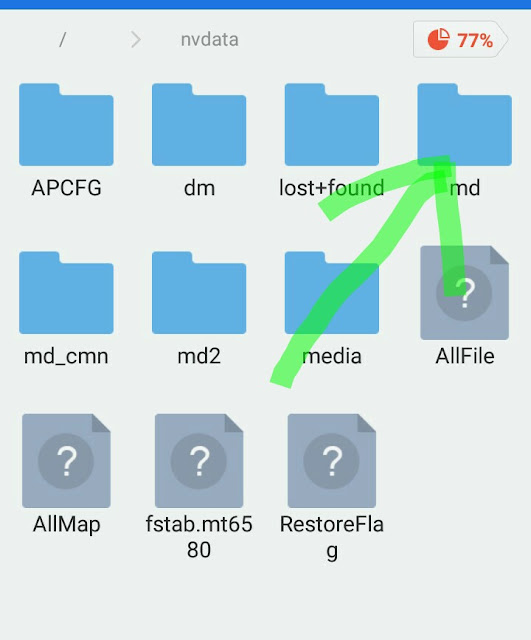
♦ Now you have granted root. Go-to your file location and click on the slash [ / ] to get to the root directory.


♦ You will see a window like the one in the picture below. Click on the
nvdata file


♦ Now Click on the
md file


♦ Click the
NVRAM File


♦ Copy the
NVD_IMEI** File


Paste the file to a SD Card. Where you can easily access it when you need it.

Now when you flash the Custom Rom and get Unknown Baseband. Replace the Nvd_imei file with the one you copied to your SD Card.

Reboot once done. You will get your signal bar running again.

Like this


Thanks for reading and Kindly Share if you find this Helpful.